Building the Waypoint Logger
Before you can record waypoints, you need to create the pure_pursuit package and write the waypoint_logger node. This tutorial walks through the code step by step.
Note
This tutorial covers the concepts behind the code. For the graded assignment with deliverables, see Lab 6 - Waypoint Logger for Pure Pursuit in the Weber Assignments.
Why a Waypoint Logger?
Pure Pursuit needs a pre-recorded path to follow. That path is a CSV file of poses (x, y, heading) captured while you manually drive the car around the track. The waypoint logger subscribes to the particle filter’s pose output and writes each pose to a file as you drive.
The pipeline looks like this:

The particle filter publishes the car’s estimated map-relative position at ~30-40 Hz. Your logger captures those poses so the Pure Pursuit node can replay the path later.
Step 1 — Create the Package
On the robot, create a new ROS 2 Python package:
cd ~/f1tenth_ws/src
ros2 pkg create pure_pursuit --build-type ament_python --dependencies rclpy nav_msgs geometry_msgs
This generates the standard ament_python package structure:
pure_pursuit/
    package.xml
    setup.py
    setup.cfg
    pure_pursuit/
        __init__.py
The --dependencies flag adds rclpy, nav_msgs, and geometry_msgs to package.xml automatically. These are the packages your node will import.
Create a directory to store waypoint CSV files:
mkdir -p ~/f1tenth_ws/src/pure_pursuit/maps
Step 2 — Understand the Data Source
The particle filter publishes on /pf/pose/odom using the nav_msgs/msg/Odometry message type. The fields you care about are nested inside the message:
Odometry
    pose
        pose
            position
                x       <-- map x coordinate
                y       <-- map y coordinate
            orientation
                z       <-- quaternion z (encodes heading)
                w       <-- quaternion w (encodes heading)
You can inspect a live message yourself to see exactly what the particle filter publishes. You need bringup and the particle filter running first:
Start bringup (Terminal 1)
Launch the particle filter (Terminal 2):
cd ~/f1tenth_ws
source /opt/ros/humble/setup.bash
source install/setup.bash
ros2 launch particle_filter localize_launch.py
Open RViz2 with the particle filter config (Terminal 3):
source /opt/ros/humble/setup.bash
source install/setup.bash
rviz2 -d ~/f1tenth_ws/src/f1tenth_system/particle_filter/rviz/pf.rviz
Set the 2D Pose Estimate so the particle filter is localized.
Echo the topic (Terminal 4):
ros2 topic echo /pf/pose/odom --once
This prints a single Odometry message showing all the fields:
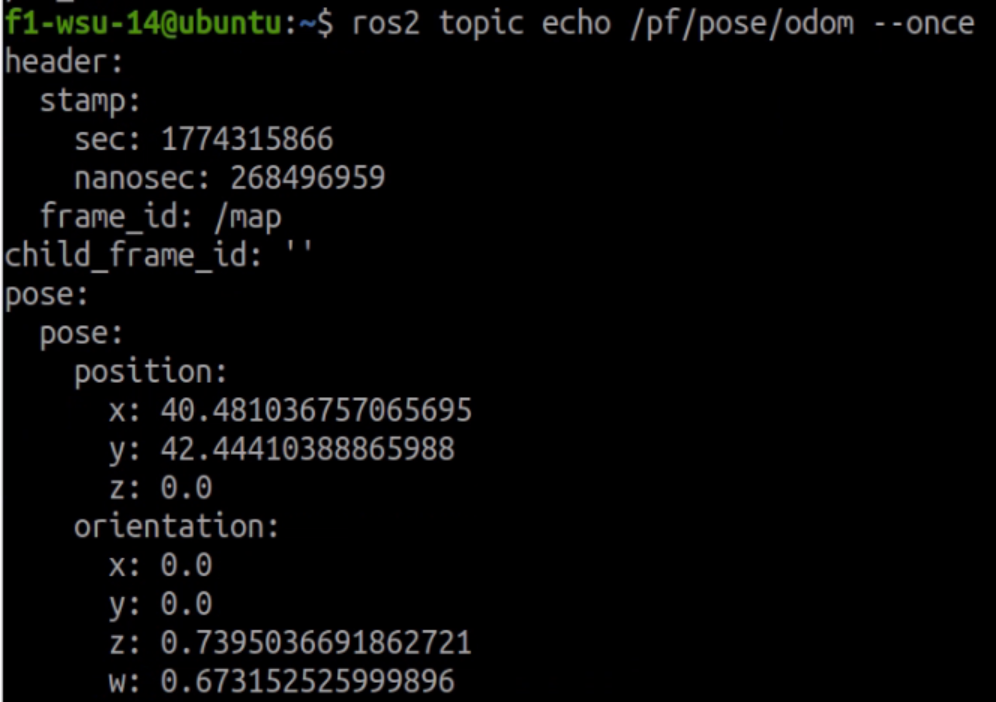
Most of this message is not needed. Your logger only extracts four values from the pose.pose section:
Field |
Units |
Description |
|---|---|---|
|
meters |
Car’s horizontal position on the map |
|
meters |
Car’s vertical position on the map |
|
unitless (-1 to 1) |
Quaternion z — encodes heading (rotation around vertical axis) |
|
unitless (-1 to 1) |
Quaternion w — scalar part; with z, gives heading: |
Note
Why quaternions instead of an angle? ROS 2 uses quaternions to represent orientation because they avoid gimbal lock and singularities. For a car driving on a flat surface, only z and w matter (x and y are zero). You don’t need to convert to an angle for storage — just save the raw z and w values. The Pure Pursuit node will convert them when it needs the heading.
Step 3 — Write the Node
Create pure_pursuit/pure_pursuit/waypoint_logger.py. The node has three responsibilities:
Open a CSV file when it starts
Subscribe to
/pf/pose/odomand write each pose to the fileClose the file cleanly on shutdown
Subscription and Callback
The core of a ROS 2 subscriber node is the callback. Every time the particle filter publishes a new pose, your callback fires and receives the Odometry message:
from nav_msgs.msg import Odometry

self.subscription = self.create_subscription(
    Odometry,
    '/pf/pose/odom',
    self.pose_callback,
    10
)
The 10 is the QoS queue depth — it buffers up to 10 messages if the callback is slow. For a simple CSV writer this is more than enough.
Extracting Pose Data
Inside the callback, pull out the four values you need:
def pose_callback(self, msg):
    x = msg.pose.pose.position.x
    y = msg.pose.pose.position.y
    z = msg.pose.pose.orientation.z
    w = msg.pose.pose.orientation.w
These four numbers fully describe where the car is and which direction it is facing.
Writing to CSV
Use Python’s built-in csv module or simply write comma-separated strings. The CSV should have no header row — just four values per line:
1.234, 5.678, 0.123, 0.992
1.245, 5.690, 0.125, 0.992
...
Open the file when the node initializes and write in the callback:
import csv

self.file = open('/path/to/waypoints.csv', 'w', newline='')
self.writer = csv.writer(self.file)

# In the callback:
self.writer.writerow([x, y, z, w])
Clean Shutdown
When you press Ctrl+C, ROS 2 shuts down the node. You need to make sure the CSV file is closed properly so no data is lost. Two common approaches:
try/finally in
main():def main(): rclpy.init() node = WaypointLogger() try: rclpy.spin(node) finally: node.file.close() node.destroy_node() rclpy.shutdown()
Override
destroy_node():def destroy_node(self): self.file.close() super().destroy_node()
Either approach works. The key is that the file gets closed so the OS flushes all buffered writes to disk.
Terminal Feedback
At ~30-40 Hz, printing every pose would flood the terminal. Instead, print a confirmation periodically (e.g., every 50th pose):
self.count = 0

def pose_callback(self, msg):
    # ... write to CSV ...
    self.count += 1
    if self.count % 50 == 0:
        self.get_logger().info(f'Recorded {self.count} waypoints')
This gives you visual feedback that the logger is working without overwhelming the output.
Step 4 — Register the Entry Point
ROS 2 Python packages use setup.py entry points to define executable node names. Edit setup.py in the pure_pursuit package and add your node to console_scripts:
entry_points={
    'console_scripts': [
        'waypoint_logger = pure_pursuit.waypoint_logger:main',
    ],
},
This maps the command ros2 run pure_pursuit waypoint_logger to the main() function in your waypoint_logger.py file.
Step 5 — Build and Verify
cd ~/f1tenth_ws
colcon build --packages-select pure_pursuit
source install/setup.bash
Verify the node is registered:
ros2 run pure_pursuit waypoint_logger --help
If it launches without import errors, the package is built correctly. You can now proceed to Recording Waypoints to record a lap of waypoints on the actual robot.
Key Concepts Recap
Concept |
What You Learned |
|---|---|
|
ROS 2 Python package structure with |
Subscriptions |
How to subscribe to a topic and process messages in a callback |
Odometry message |
How pose data is structured inside |
CSV file I/O |
Writing real-time data to a file with clean shutdown handling |